When I met up with Carole from the lovely blog Piglet in Portugal, in June, while I was in the Algarve, I gave her the prize she had won for commenting on my 100th post competition.
As my suitcase was already overloaded at my departure to Europe, I decided I would buy the box and painting materials in France, it would be easier, and I wouldn't run the risk of crushing the box either.
Originally I had planned to paint the box in pink and put some "piglets" made out of clay on the lid.
I went into a crafts shop in Martigues, where my daughter lives, but probably because I couldn't explain my idea in French, and my daughter wasn't available to go with me during the week... I was unable to buy the clay.
But I liked some of the painted boxes they had on display, and with a bit of "Franglish" I conveyed my wishes to buy the materials to paint something similar.

Materials used:
Papermache Box, 1 soft brush, Primer, 2 contrasting acrylic colours, crackle varnish, Mod Podge, 1 sheet of silk paper or 1 serviette with desired design, bottle of "paillettes" (sequins) in glue and spatula to apply it.1 - Because it´s a Papermache box, it has to be primed first, inside and out, otherwise it will absorb too much paint, and will need a few coats to cover it well.
If using a wooden box, first sand it with fine sandpaper, wipe clean and apply a primer.
 |
| Waiting for the crackle varnish to dry... |
3 - Apply the crackle varnish generously without going over the same spot twice and let dry.
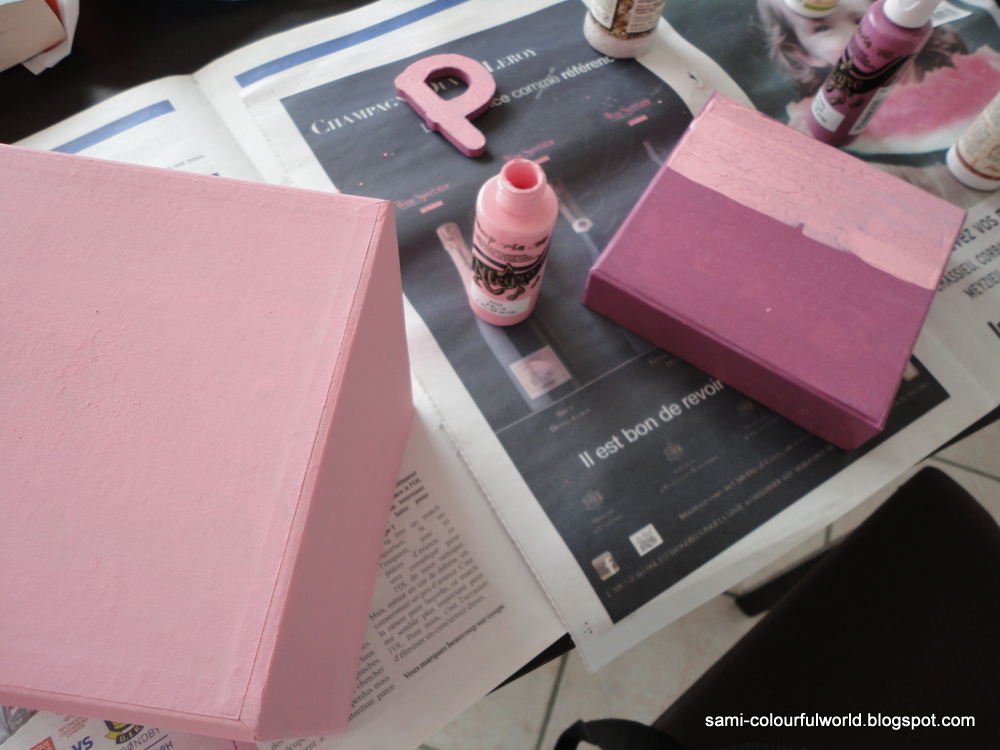
4 - When dry, apply the second contrasting colour generously, also without going over the same spot twice. You will notice the cracks starting to appear. Let the paint dry well.
 |
| After applying the second colour, the cracks start to appear |


5 - I chose to leave two of the corners without the Crackle varnish, as I wanted to glue some silk paper in those areas for added interest. The paper was cut to size and glued with Mod Podge. The inside of the box was also painted. To finish the box, the edges between the paper and the paint were sealed with a product that had gold "paillettes" - sequins in glue.
The whole box was then painted over with mod podge to act as a glossy sealer. You can use a gloss varnish if you wish.
 |
| The sequins in the glue paste, will then become transparent when dry |
 |
| One side of the box |
 |
| the other side of the box |
 |
| The lid - P for Piglet |
 |
| Details of the crackle and the lid with the gold "paillettes" |
Beautiful! I bet Pip was tickled pink with such a beautiful prize.
ReplyDeleteGreat tutorial. I didn't know about priming a box. I've always had problems with cardboard buckling or bubbling when I put too much glue or paint on it. I didn't know there was around it. Cool! Very helpful.
Your crackle box turned out great. :)
Thanks E.C. Yes, priming is always good as it prevents the box from absorbing too much paint, hence a better finish. Pip loved her box.
ReplyDeleteReally cute!
ReplyDeleteQuem é artista, é sempre artista em qualquer parte do mundo... e o resultado fala por si. Parabéns.
ReplyDeleteHi Sami,
ReplyDeleteI certainly do love my box and it sits in pride of place on my dressing table.
Obrigadinha!
Thanks Carole, glad you like it. xx
ReplyDeleteOh well done Sami, how clever..I loved the silk paper touches on the corners such a great idea, I can see why Carole loved it so much.
ReplyDeleteThanks Grace.
ReplyDeleteThis comment has been removed by a blog administrator.
ReplyDelete